This time we won’t be using any cloud components as I want to show you the old way to do it, sort of speak, using a Linux VM. This example focuses on the following functionality: upload, delete and list, and to harden it to the extend I can. There are several ways to do it, but mine is as follows:
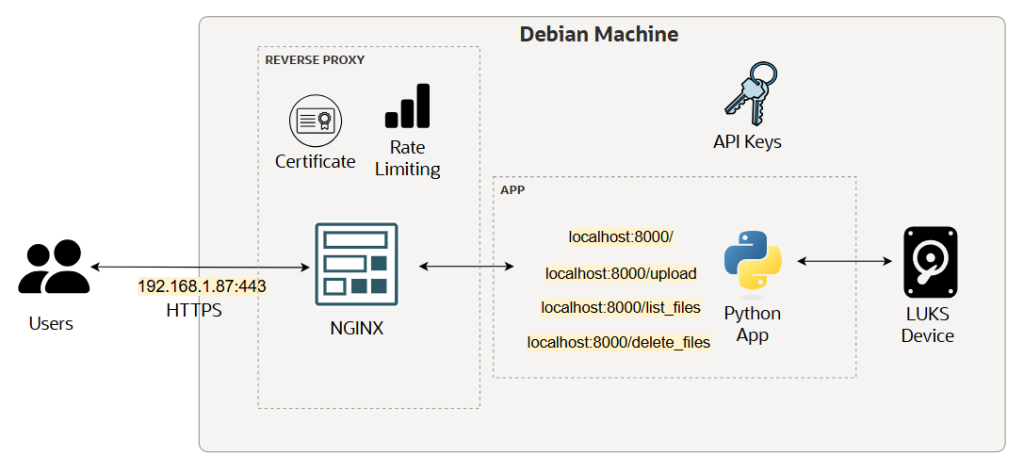
- A python script only reacheable on localhost:8000, I use the fastAPI library
- A systemd service to keep our script up all the time
- A barebone linux system user with no shell access to launch the service
- Nginx as reserve proxy
- Self signed Certs to enable TLS communication
- Mount a separate storage dedicated to the uploads
Then in terms of security we need to think of and set-up
- encrypted in transit
- encrypted at rest
- set-up authentication (with API Keys)
- set-up rate limiting
- obfuscate the API endpoints so they are not accessible from the outside world
- set-up authorisation <- I leave this one aside, it’s not an easy one and in this case I am the only user.
Let’s go through the bullet points together one by one – the python scripts are available here… main.py gives you four paths: health-check, upload file, delete file and list file. They require an API Key for them to work and the logic is located in the secure.py file. We use the fastAPI library to get our API running quickly. Running and testing is easy, simply launch and test your endpoints with the commands listed in commentary in main.py (Just make sure you import the libraries with pip, and create the upload folder…)
curl -H 'x-api-key: abcd' --form file='@yourfile.txt' http://localhost:8000/upload

{"message":"File saved OK at 2026-02-24 15:35:29.513214"}
Here you are, you have just uploaded yourfile.txt from your current directory into your upload directory. Congratulations you have just created an upload API or should I say a very rudimentary Google Drive upload 🙂 Don’t forget to test the rest of the APIs.
Next we want a systemd service to launch the script everytime the machine start, so let’s go to /etc/systemd/system and create the service configuration file with vim dropboxlike.service
[Unit]
Description=My dropbox like service
After=network.target
StartLimitIntervalSec=0

[Service]
Type=simple
Restart=always
RestartSec=1
User=projectuser
ExecStart=/usr/local/bin/dropboxlikeproject/startup.sh

[Install]
WantedBy=multi-user.target
You see the ExecStart? This is what systemd init system runs to launch the service, in this instance a file called startup.sh – Also, I did some research and it appear that /usr/local/bin is best practice to store scripts. Let’s have a peak into startup.sh, it simply get the virtual environment up for python and then launches the python code.
#!/bin/bash

cd /usr/local/bin/dropboxlikeproject
source env/bin/activate
env/bin/python ./main.py
Note that I launch it with user projectuser, and thus I created a barebone user with the command below. The user has no shell with /usr/sbin/nologin and has no HOME folder, this is also best practice in case the user gets hijacked internet says.
useradd -r -s /usr/sbin/nologin projectuserFinally let’s not forget to set ownerships correctly, your user needs to be sole user and owner, and the same applies to the upload folder:
chmod -R 500 /usr/local/bin/dropboxlikeproject
chown -R projectuser: /usr/local/bin/dropboxlikeproject
chown -R projectuser: /var/dropboxlike_temp/
Let’s move onto nginx now, but why do we need it? We want it because we do not want our script to be reachable from any of its public network interfaces. We want to limit it to listening only to the localhost, and what we do then is to stick a specialised bit of software in front which is some sort of a “gateway”. Download nginx and type the command vim /etc/nginx/nginx.conf. Inside the http block I’d like you to add the below. Also the full nginx.conf file is available here 😉
limit_req_zone $binary_remote_addr zone=mylimit:1m rate=1r/s;
server {
                listen 443;
                server_name 192.168.1.87;

                ssl_certificate /home/debian/certs/certificate.pem;
                ssl_certificate_key /home/debian/certs/private.key;

                ssl_protocols TLSv1.2 TLSv1.3;
                ssl_ciphers HIGH:!aNULL:!MD5;

                location / {
                        limit_req zone=mylimit;
                        proxy_pass http://localhost:8000;
                        proxy_set_header Host $host;
                        proxy_set_header X-Real-IP $remote_addr;
                        proxy_set_header X-Forwarded-For $proxy_add_x_forwarded_for;
                        proxy_set_header X-Forwarded-Proto $scheme;
                }
        }
We are telling nginx to listen on my network card at IP 192.168.1.87, and to bind at port 443 because the communication between the client and reverse proxy is to be TLS enabled. We also say proxy_pass which means pass the requests directly to localhost on port 8000. Here the reverse proxy serves as ‘encryption termination endpoint’ where the TLS encryption stops, and for it to work we have to use the PKI and to make it simple we create a self signed certificate and private key in one go with the command below. Just bear in mind that in the real world you will have to get a proper cert form a proper CA… a simple way to do it is to use Certbot, details are here.
openssl req -x509 -newkey rsa:4096 -keyout private.key -out certificate.pem -sha256 -days 365Once the files are generated refer to them in nginx.conf with ssl_certificate and ssl_certificate_key. The rate limiting is also handled by nginx with the limit_req and limit_req_zone directives, please see here.
If we give it a try and upload a file onto our server it will work nicely.. but – I get some upload failures on big files from time to time .. (Who knows?)

and our file landed where it should

Last step is to secure data at rest, at the moment after a lsblk command we have our /var folder mounted on its own disk /dev/sdb which is best practice if we think about it, we want the uploads to be separated from our system, right? but also we want it encrypted! if anyone steals the physical disk we want to make sure it is unusable. I use the cryptsetup utility to cypher the disks where the storage resides, a good guide is located here. The /var/dropboxlike_temp/ is where all the uploads are located, so see below the encrypted mount point, now showing “crypt”. But we have a problem.
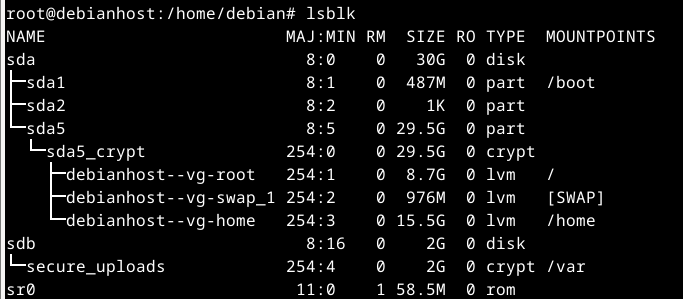
I encrypt /var and it is troublesome, after a good amount of fiddling with LUKS and initramfs at boot time, I recommend is to have a clean mount point completely separated from reference to any critical system directory (like /var!!!), so just create a mount point like /uploads instead.
And that’s it, we have build together a file storage repository for personal use… we realise that it is when we do the config that we appreaciate the extreme convenience of the cloud services e.g. Object storage, and API gateway and others – most of the config is done for us, and we do not have to worry about maintaining the components!
Note there are two critical components I voluntarily leave aside in this article which are the UI that I leave up to you, and the authorisation logic, since this is a single user system.